Saturday, November 28, 2020

Reader participation rules! And other excuses for rambling on about spinning


A local friend I exchange emails with quite a bit, was asking about the spindle and how it relates to the spinning wheel, and it reminded me that I was going to write about that, because a lot of people to whom the whole notion of spinning is a bit of a mystery, often ask about it.  This is all your doing, Marilyn!

The spindle far precedes the wheel in history.  It's been found in prehistoric gravesites of women, the assumption apparently being that in the afterlife they would go right on spinning, so they'd better have their spindle at the ready. Well, to be exact, the whorl, which might have been stone or ceramic.  The wooden shafts long since deteriorated to where they can't be found now.

For many centuries women spun linen, cotton and wool for all the fabric needs of their lives.  Viking women spun the linen thread which was woven into sails for the ships which then proceeded to set off across the ocean to plunder my homeland, well, okay, it was a long time ago, and they did leave us with some wonderful northern language, still in use in the northern counties of the UK.  And every stitch they wore was spun by women using the spindle.  Then it was knitted or woven or used in other similar ways to clothe their entire families.

The distaff is that stick with a lollipop of yarn tied at the top that you see in old illustrations, always used by women, hence the term distaff side, meaning the wife's side of the family. It was a handy way of keeping a good supply of fiber available all the time she was out and about tending animals and poultry and gardens, and whatever else she had to do that day.

It wasn't originally about sitting peacefully in a little cottage with a view of mountains and spinning and humming contentedly.  A spinner is known as a spinster, and the term meaning unmarried woman came about because if a woman didn't marry, spinning was her main means of self support and to take her place in the income of her family of origin. It was inescapable for her.

Anyway, much later, when greater production was needed, and there are a lot of academic debates and when and where, the wheel came into existence.  Some people claim it predates the current era, some say it was medieval, some say European, some say rubbish, it was Arabic in origin (like a lot of other great ideas, such as algebra, look at the name if you doubt this!)

The wheel doesn't materially affected the actual drafting and spinning, but it saves a lot of time since the output is automatically fed onto bobbins, and you don't have to keep stopping to wind the yarn onto the spindle, as you do without a wheel.

So when faster was needed, the wheel, still operated by women, came into use. But now she couldn't wander about working as before.  She was pretty much stuck where the wheel was.  A precursor of the office job, in a way.  And definitely a precursor of the Industrial Revolution, where the spinning wheel was mechanized and turned into a mass production machine, with which humans were obliged to work long, dangerous, poorly paid hours, don't get me started. 

Anyway, I found the wheel, on my summer of trying it out, to be a rotten experience, like a treadmill, really.  No stopping places except when a problem arose, just on and on.  Now some people absolutely love this, and I'm not saying anything about that, just it's different strokes, different folks.

The spindle suits me, and a lot of other people, better, because it's two different activities, alternating, the spinning and the winding on. They're different skills, and I like the rhythm of moving back and forward between them.  I also love the portability of the spindle, and I've spun in various rooms of the house.  Not out of doors, because I don't want to be catching debris and leaves in my yarn, got enough to deal with.  Some really skilled people spin while walking out of doors.

I don't spin in public, because nowadays it's unusual enough that people assume I'm demonstrating and want to stop me and ask questions, and that's not the deal. I have done public demos, which were advertised as such and I was glad to explain and stop and start for that purpose. But when I'm just quietly spinning, that's what I'm doing.

 A word to the wise: if you see an artist working, and want to learn from them, assume you're requesting a professional lesson and that there will be a fee. Don't assume their skills are yours for the taking, okay? thank you.  What I show here is what I want to share, and I'm glad to.  But when I'm working, I'm working, and that's a different thing.  I do refer people to YouTube a lot to get started on any interest, really, including the fiberarts. And when I go to my knitting groups, I'm there to play, just like everyone else, not to work, and teaching is definitely work, if you do it right. End of grouchy aside.

Anyway, that question about the history of spindles and wheels reminded me of lovely Lois Swales, a historian and researcher into textiles, who put up a highly entertaining series of short videos on YouTube a few years ago, which still work a treat. She dresses the part, too, always a nice touch!


Here's her Spin Like a Viking video, showing the stone whorl set on a wooden stick


Along with other early Scandinavian tools


And here's her medieval video, with the distaffs in the background


And medieval examples of various spindles.  She also carves and turns her own spindles, in the interest of research.


And my part-Scottish blood took a great interest in this.  In the Maritime Provinces of Canada, there is a strong Scottish influence, on the fiberarts and the different ways of spinning and plying done by our Scots foremothers.  This included a spindle called a dealgan, which she obligingly pronounces for us, like jallagan.


And here's where I learned some useful stuff I hadn't noticed before, when I was too much of a beginner at spinning to take it all in, and I hadn't even tried plying at that time.


The old Scots way of plying is to create a ply ball.  Just make a ball of the two yarns side by side, unplied, before plying.  So I did that, and found several great advantages, one being that I could spit splice as I went and get a bigger ball of yarn ready to ply, the other being that I could go on longer, adding in singles as I had finished them.

She also reminded me that you use a bigger spindle for plying than you did for the spinning, which I had found out recently by discovering it was hard to ply with the same size spindle as the spinning was done on. Also your big spindle is waiting for the next supply, and you can get on with spinning on your smaller ones.


So here's the result, two smaller spindles in the picture for comparison. And a nicely plied length of yarn waiting for additions, part of which is on the new spindle on the right.

A well spent morning, and if it encourages you to try your hand, good.  If you just want to be entertained by Lois, good, too, she's very knowledgeable but also funny, a great combo, I'd say. She explains that she's a good teacher because she's made all the mistakes so she knows what she refers to as spinning tragedies!

If you're interested in research, be aware that the internet is packed with misinformation on the fiber arts often written by people who literally don't know that spinning is one thing and weaving another.  Or that it's impossible for the princess to have been pricked by a spindle or any other part of a spinning wheel, which shows how reliable fairytale writers were, too!  Stick with people like Lois and her references.  You'll do better.


Friday, November 27, 2020

Inbox reveal

 You saw this on Field and Fen


And here's the rest of the story.  As you see, signed and personalized by the maker; Akerworks  is a small company


It's my birthday present to me from moi.  A geranium spindle, modular, you pick the color and style of the whorl. I think the whorl, that's the roundish bit that's not the shaft, is 3D printed. And you choose the shaft length. And the parts are a perfect, snug fit.


This whorl can be slid up and down the shaft, depending on whether you like to spin with a high whorl, like here, which I do, or a low whorl, which some people do, and I don't.  My wooden Schacht spindles can be switched to turn whichever way you want, the hook at the top of the whorl, and there's a groove incised in the bottom to hold the yarn if you like the bottom whorl way instead.


So I quickly assembled the two pieces, and went for a test drive.  I had seen this in use on YouTube, and was impressed by the speed  the spinning teacher could get on the spindle without a lot of effort.  I find that my wooden ones need enough pressure that I get a bump on my finger where it keeps having to apply pressure on the turning motion. But I wondered if this is a user problem, and if the new one would be as laborious for me as the wooden ones.

But look. This spindle has that thing at the base of the shaft, see it?  to hold for the flicking movement.  And after my first try, I have to say this is the Lambo of spindles.  Compared to this, my Schachts, much as I love them, are more the Honda Civic, trustworthy, reliable, will never get up a turn of speed, at least for me.

There are a couple of other advantages, too, to this shape, but no need to go into every detail.  Just call me a happy customer of the folks at Akerworks.

I've been promising myself one of these for ages and ages, and finally thought, why not, you're worth it. So I did.

Wednesday, November 25, 2020

When the student is ready, the teacher appears

 In this case the teacher, or a series of them, is the collection of roving ends I'm spinning into plied yarn.


As you see from the cardboard tubes with spun singles on them, waiting for plying, spinning has been going on.  This represents quite a bit of spinning time.

And as always, art materials teach us as much as we're willing to learn from them.  In the case of spinning waste roving ends and tops, as I'm doing, each one has a different texture, different need from the last.

You get the hang of one lot, then it's spun, and you're onto the next, which is different, needs to be handled and drafted differently. 

 I find that if I listen and watch, the roving itself shows me how to go on.  If it's very fuzzy and long stapled, it will ask to be picked up and drafted in finer amounts, as long as the yarn doesn't break, and the turquoise one is one of those.  It ended up spinning just a treat, once I got over my dismay at wondering if I could spin this fuzz at all.

Then the red one, a different sort of roving, silkier, I think a mix, easy to draft and spin, and just very willing to cope with me.

But the yellow, ah, another thing entirely.  A horse, or yarn, of a different color. I think it's silk, judging from the way it snags on my winter hands and the luster and intensity of the color. 

There are little knotty areas in it which are resistant to be undone.  At first I got a bit impatient about this, and wanted to smooth everything out, then I realized that it's better to address the nature of the roving before forcing it to do what I planned.

This worked better for both of us, and there are little slubs here and there, okay, probably they won't even be evident once it's plied, we'll see.  And I did think that if I made cloth dolls, this would make fabulous shiny blonde hair.  

The Dollivers, whom you saw here are all knitted, so their hair is yarn, in keeping with the rest of their bodies.  And, if ever you want to amuse yourself with simple knitting that is also fun, try one of them. They're not difficult, but, as with all dollmaking, their character emerges as you work.  Before they're finished, they have personalities.  It's a little eerie.

Here's where to find the Dollivers' origin, and the other animals I mentioned in the Thanksgiving post linked above.


The Knitted Babes are pretty accessible to beginning knitters with basic knowledge.  The animals do require some experience and the ability to follow more complex directions.  But as you saw from my results, they do work.

Back to roving.  This is a visual adventure, quite aside from being a productive one.  I've learned better spinning, better understanding of different rovings, just from observing and working with them rather than knowing ahead of time what they actually are by name.

I think this is a helpful way to learn, in fact.  Once you name a thing you've basically stopped learning about it. Your brain thinks, well, that's sorted, then, no need for further thought, and it stops.

This is why you don't name what you're drawing as you draw it.  In fact, when I used to guide students, I never named parts of their work at all, so as not to disturb their drawing understanding. I'd refer to "this passage" or "that section" without naming, and it was more useful for their continued learning rather than labeling and filing it away never to be considered again.

One of my friends, a naturalist, pointed out that there's an exception to this avoiding of naming, which is in the case of a plant. If you can find out the name, that's what you need in order to learn more about its taxonomy, origins, discoverer, cultivation, all that.  So I conceded that, since I've done it myself.

When you're creating though, better not. You see better when you don't clutter up your vision with a bunch of nouns. And just enjoying the textures and colors is plenty to be going on with.


Friday, November 20, 2020

Jewels in the veggie box

 My Misfits Market box, (for more information on what was in it this week, go here) arrived today, and it took a long time to prep them, because I had to keep stopping to admire and take pictures of the total beauty of things like this


A red cabbage, sliced across the equator


A wedge of cabbage when I was cutting out the core.  This is a bit geological, like some semi precious stone or rock formation.


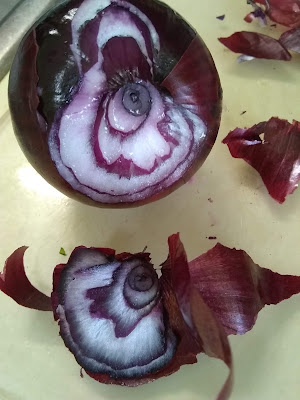
Red onions, posing like dancers, look at that design, if that doesn't trigger ideas to the artists reading here, I'll be amazed


And here's a vertical section of a red onion.  In the background you see all the skins and debris from prepping the cabbage and onions?  That's now bagged and in the freezer, because it's great dye material for the next time I plan on dyeing fabric or yarn.  Or anything else, for that matter.  Never throw away veggie trimmings before you've investigated all the uses they can be put to, is my motto.

I finally tore myself away from admiring and taking pix and tweeting about it, and got them prepped and frozen. Finally.  But new ideas are happening about drawing and dyeing and all the things that jewels of nature like this tend to trigger.  You can also ink up and print with a cross section of cabbage, making a wonderful image that looks very much like a rose, a cabbage rose, unsurprisingly, whoever named the rose knew her gardening stuff.

Friday, November 13, 2020

Output to date

To date, the plied yarn fun looks like this. Many hours of work/pleasure.

It's such a trip, watching the colors fly by, mixing as they go. Can't wait to have enough output to start knitting without running out in no time.

Thursday, November 12, 2020

Spinning again, to Spinal Tap


I've been spinning again, and felt very pleased that I can spin without having my hands and arms shouting for a break.  However, I may have overdone it just a bit, since this morning I could have used a lever to get out of bed. My back explained she'd rather stay put, thank you, all stiff. I sort of hobbled to the bathroom, applied my go to, arnica gel, the real gel, and even that was a bit hard to do.  And it took effect quickly, so I'm functioning again.  But I don't think I'll spin today, much as I'd like to.  

I'd just reached a good place, where I was getting the drafting right, and the yarn was even and fine and as you see on the spindle, much better than the other sample on the cardboard roll.  However, I hope I can recover that magic spot when I pick it up again tomorrow.

The blue you see there? I picked that up in dim light, while I was watching Spinal Tap, and thought it was a soft grey, just nice for following the pink. Oh.  Anyway, once plied with the black, it won't matter much.

The drawback to watching movies like Spinal Tap, the Rockumentary, is that there's a lot of visual humor, and I can only watch when I'm winding the yarn onto the spindle.  When I'm spinning I have to observe the drafting process.  So it's a bit like catching the action on flash cards.  Still a very funny movie, though, highly recommended to people who spot the references.

Sunday, November 8, 2020

Paper making, Part Two, The Reveal

So here's the post of paper,  dried in the linen closet overnight, and you can see the process of removing the paper from the felts.

The paper clings firmly to the felts and you start by persuading the edges to lift


Then slide your hand under the paper to lift it off. This is one of the best parts, like pulling a print and seeing those wonderful edges, or taking the tape off the edges of a watercolor.


Then see what it looks like


Top left, I removed a couple of petals to create ghost images
Top right lint partly laminated into the paper
Bottom left raised sculptural shape
Bottom right lint again rising and falling into the surface


The pulp I added makes some interesting negative shapes
top line
Bottom, right, flowers embedded


The bottom one here is interesting because it picked up yellow color from the felt, probably turmeric from a previous use.

Some are background on which other work can be mounted, some are standalone artworks for framing. You can see the range just in this little post of ten. What you probably now realize is that handmade paper of this kind is itself an artwork. It can be drawn on with dry media, and you can mount flowers and grasses on it, since it's acid free, but it's not a material for just writing on. I have stitched into paper, too. In fact I have a couple of gold work embroidery ideas for some of these pieces.

Hard to see white on white, but a couple have a really pleasing raised area that looks sculptural, and stitching could work well there. Hm. Thinking.

All in all, a good day's work. Some of these look wild now and will frame up nicely.

If I had wanted a big single piece, I could have flopped out the individual pieces directly onto another surface, edges overlapping, and they'd have bonded as they dried. Or you can join them dry, using white glue, Sobo is best.

And you never, ever, cut handmade paper. That would be a crime against nature. If you want to reduce the size, you paint a line of clean water along your boundary, then ease it apart. You can also use a steel ruler to tear along, and create a fake deckle.

This has been a lovely interlude, and I'm back to spinning next. Thanks for following along,and maybe you'll like to try your hand. As you see, you probably already have the tools. 

Friday, November 6, 2020

Papermaking part one

Since today is warm and not too windy, a good day to make a post (stack) of paper. Also my produce box will be here a day late, because the crew got a day off to vote, good. So this is Saturday's planned work brought forward. Making a post of paper. Tech alert for names of gear coming up.

First to assemble the materials and tools


The container is my paper vat, which is a $2 dishpan. Since it will be filled with water, important not to oversize it for a one person operation. Water's heavy. It means i\I use small molds and deckles, see later, but them's the breaks.

In the container, left, sheets of processed fiber, here second cut cotton linters from Carriage House.. It takes serious equipment to process cotton fiber  for paper, such as a Hollander beater, and other such impressive stuff. You can access that in your college studio courses, then later your personal studio finds this handy instead. It makes a beautiful white paper, crisp. There's also abaca (banana) fiber sheets under there, for a softer, creamier colored paper.  You can mix the two, too, for different effects.

Today I used a single sheet of the cotton linters. This is cotton fiber at stage two: first it's picked, then ginned to remove the seeds, then processed again, and this is the result. It's totally ph balanced, will survive centuries, totally safe material. I'm saying this because you see it in my kitchen. 

On the right, in the vat, are molds and deckles for actually making the sheets of paper. I made my first one from scratch way back when I studied it, but it needs a bigger vat, so I use these. The shape of the mold gives you the shape of the paper. Whatever shape you want, just create the mold to suit. Embroidery hoops are useful, and hold the screening nicely. And the plastic stitching canvas is handy, and works fine. The deckle is a frame you hold onto the mold when you submerge it in the pulp. It gives an edge (deckle edge) to your paper sheet, if you want a uniform shape.

And here are inclusions


Lint, courtesy of Joanne's loom, also cotton


Flowers, some from friends' gardens, some from a birthday bouquet last year. These will be picked up on the mold as you bring it to the surface, and they'll bond with the fiber. The rose petals on the top left smelled wonderful when I opened the bag. They've all been in the freezer for months.


And here's the dish, which used to be a roasting pan,  to hold the dripping wet paper, and the felts to flop it onto. Some felts are made of felt, but mine are interfacing, works a treat. I've been using these about forty years.


Blender, vital, you need this, and they burn out under the stress, so always looking for secondhand ones. This, before you ask, is specifically for paper, never food. My food blender is separate.


Then the process, see the testing to determine if enough breakdown has happened.


You tear up the cotton linters sheet, a few pieces per blenders worth, blend till reduced as you see above, a few minutes


Then keep adding each batch to the vat. I like to use lukewarm water, for the sake of the papermaker, the paper doesn't care.


Stir the pulp around with your hand gently before sinking the mold under the surface. I didn't use a deckle, that's a frame, here, because I didn't want a geometrically rectangular piece, wanted a looser edge. I made this mold from a picture frame to which I attached screening.


Let it drain briefly


Then in one swift move turn the mold over onto the waiting felt and press gently to release the fiber pulp from the mold, so you can use it again.


Here's green lint lifted up into a sheet


And flowers similarly


I splashed a bit more pulp over the flowers after this.  Just wanted you to see them first.


Now we're outside with the pan of dripping paper, all interleaved with felts.


Here's the paper dance! You put the pan on top of the stack of felts, and tread gently about to press as much water out as possible, to speed up the drying, also it's fun to dance.


Then lift each felt, with its paper piece, and lay it out to dry. I've left this post on the felts, but you can also slap off the paper onto a shiny surface like windows, mirrors, appliances, if you want a smooth side and a rougher side, peeling the felt off the paper, leaving the paper behind on the glass. When it's dry it will peel off. But it will obligingly stay in place till you peel it off.

I was a bit tired at this point,  a lot of lifting involved, so I just laid it out. When it's dry, maybe tomorrow, I'll peel the paper off the felts and we'll see how it goes. My skills were a bit rusty, took a few sheets to get the movements back.  This is the output, ten sheets, one's hidden, from one of those small sheets of processed fiber.

There are all sorts of things you can add to change the texture, make more transparent effects, and today I did the simplest because I felt like it!

This is much simpler than when I make paper from local foliage, such as iris and daylily, or onionskins, or grasses, where you harvest and wash and cut and boil endlessly to make a pulp, which you blend with water as above,  to which I often add a bit of abaca fiber for more flexibility. 

This makes good paper, though. It's cool to know how to do it both ways. You'll notice that I work with original fiber or plant material. I never add in commercial paper, because the acid content is at odds with the purpose of a pure paper.

When you're finished the pulp in the vat, you're left with what looks like an innocent dishpan of water. Do not, not, pour it down the sink.  It has cotton fibers throughout, and it will gum up your plumbing very expensively.  But it's okay to toss it outside on the earth, quite harmless.

Sometimes you see an activity described as papermaking, when you tear up and  blend  commercial paper, magazines, colored copy paper, that kind of thing. In fact you're not paper making, you're doing something else that's fun, especially for kids, you're recycling, making new from old, always a good thing.

 It's good to explain to kids that this is recycling, a good thing, but not related to true papermaking, which they can also learn to do.  I've taught quite young kids the skills, I describe here, complete with the history of the fiber, except that I wielded the blender.  But they were pretty adept at making the paper, and loved smacking it off onto the windows!

You can never forget, when you use cotton, that the cotton crop has come at a terrible cost to many of our population, and to treat it with honor, as we wish they'd been treated with honor.